Sunny Days
Thursday, March 14, 2019
Bricklaying tips from Sunny Days Building Services
Bricklaying is considered one of the more approachable construction skills, and many self-builders are understandably keen to give it a go. But this isn’t a tasked to be taken on lightly, especially if you’re building structural walls. Look good in a nice garden.
The easiest route to great results is enlisting a good brickie. Using an experienced tradesman may be cost-effective, too, as it’s likely to speed up the build and minimise mistakes.
If you do want to tackle an involved bricklaying project, it makes sense to practice . Even the most confident DIYer will need to get to grips with the process first.
Trying your hand at building a garden wall is a great place to start. You’ll learn everything from setting out the footprint and maintaining level and square to mixing the mortar, bedding the bricks and finishing joints neatly.
Before you begin your project, you’ll need to figure out the number of bricks required. Standard types are 215mm x 102.5mm x 65mm.
To get an accurate picture of the number required for the task in hand, however, you need to account for a 10mm mortar bed. So to come up with the correct calculations, input your brick size as 225mm x 102.5mm x 75mm for standard products.
Project guide: Brick wall step-by-step
You will need | |
|
|
 Step 1:
After any necessary foundations have been prepared, lay out the bricks at both ends of your wall where the pillars will start. Using your string line, make a straight guideline at brick height between the two outside bricks
Step 2:
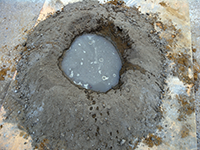
Heap five shovels full of sand and one of cement on an old board. Turn shovel to mix to a consistent colour. Form a central hollow, pour in water and mix. Repeat for a smooth, creamy texture that’s wet but not too loose
 Step 3:
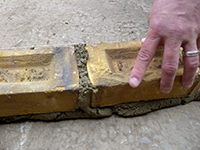
Lay a 1-2cm mortar bed along the string line. Starting at one end, lay the first brick and tap slightly to ‘bed in’. ‘Butter up’ one end of the next brick with mortar and abut it to the first. Repeat using string line as a guide
 Step 4:
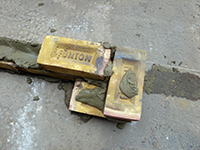
At the point where you want your pillars to start, place a brick side-on to the end of the wall. As you build up the wall, each consecutive course of pillar bricks must be laid in the opposite direction
 Step 5:
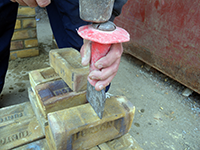
When building pillars, at certain courses you’ll need to lay half-bricks. To make a cut, place the brick on its side, locate the bolster at the split point and strike the head firmly with a club hammer. It should split cleanly first time
Originally appeared on https://www.self-build.co.uk/how-build-brick-wall/
Sunny Days Building Services | How to get and keep the perfect soil for your Garden
Sunny Days Building Services Soil Tips
Flawless soil is each planter's fantasy. Reality more often than not misses the mark regarding flawlessness, however including manure and other soil changes can build ripeness and alter the pH level, while low or no-till planting systems improve soil structure. Developing green fertilizer or spread yields in the off season can improve garden soil, too.
Consummating Your Garden Soil
1
Figure out what sort of soil you have and what you should add to assemble impeccable soil. Mud, sand and topsoil are the most widely recognized soil fixings and one key to consummate soil is striking an equalization of these three. Earth is substantial, sticky and hard when dry, yet normally rich. Sandy soil doesn't hold water well, nor is it fruitful, however it is light. Topsoil contains a great deal of natural material and is fruitful. Sandy topsoil with a touch of earth in it is commonly viewed as impeccable patio nursery soil.
2
Test your dirt's pH level. The pH scale begins at 0 - acidic - and goes to 14 - fundamental. The ideal pH level for vegetables and organic product is somewhat acidic to impartial, 5.5 to 7. Buy a pH test unit on the web or at the greenery enclosure focus. Add lime to raise the pH or sulfur to bring down it. To raise the pH level one point, include 8 ounces of lime for every square yard for sandy soils, 16 ounces for topsoil, and 24 ounces for mud. To ferment the dirt before planting, mean 20 pounds of sulfur for every 1,000 square feet.
3
Apply 1 to 2 creeps of fertilizer everywhere throughout the greenhouse each season. Manure is as near an ideal soil correction as you can get. Transform the fertilizer into the main 2 to 3 crawls of the patio nursery with a burrowing fork, or rake the manure over the highest point of the dirt, at that point spread it with 3 or 4 creeps of dry leaves or straw. Night crawlers will fuse the manure into the patio nursery bed.
4
Assign changeless ways and beds. Immaculate greenery enclosure soil is light and enables roots to develop effectively. Strolling on beds will reduced the dirt which can stunt plant development.
5
Plant a green excrement or spread harvest to improve soil ripeness and structure. Green composts are developed amid the late spring, while spread harvests are planted in the fall and turned in the spring. Spread yields shield from disintegration, supplant supplements and feed worms and soil microorganisms. Nursery workers in United States Department of Agriculture plant solidness zones 8 or hotter can plant a green fertilizer in September pursued by a winter spread harvest. Yearly furry vetch (Vicia villosa) is a decent decision for expanding the nitrogen in the dirt. Communicate 1 to 2 pounds of seed for every 1,000 square feet.
Things You Will Need
Soil test unit
Manure
Leaves or straw for mulch (discretionary)
Seeds for spread harvest
Burrowing fork
Rake
Location:
Caerphilly CF83, UK
Subscribe to:
Posts (Atom)


